
THE ANATOMY OF A SNOOKER CUE
The shaft is the part of the cue in between the front splices and the tip. It's the part of the cue where the diameter of the cue narrows down most.

The wood chosen
usually is North-American ash or maple (ahorn). Ash and maple are quite soft types of wood whe can benefit of. First of all it will help the manufacturer processing the wood, and secondly the
softness will absorb the impact more when hitting the ball. There is maple and ash as well in Europe. But the climate is different so it has a different reaction. Usually they are a bit more unstable.

With ash there is much more inner line structure visible as to maple. On the outside of the cue this will show repetitive veins. Usually the cue is held in such a way that while cueing these veins are on top and bottom of the cue. This will maximize the absorption because the cue will bend slightly vertically (but still in the aiming direction). Playing with veins on either sides of the cue (left and right) causes the cue to bend sideways slightly (horizontally) the moment of impact.
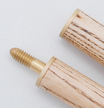
SPLICES
During the manufacturing process of the shaft, splices are added in the thicker part of the cue. Here is how they do it. To the circular form of the cue, 4 sides of the wood are being sliced off and narrowed down a bit. 4 pieces of dark wood are glued on these flat surfaces. When this is all dried, it is put on a lathe where the cue is cut into its cylindrical correct shape; creating the slices.

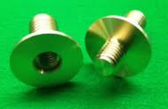
JOINTS
After finishing the slices of the cue, joints are added in the thicker part. Commonly used are screwing joints to screw both parts on one another. There are also joints that click to fit.
A drilling machine will drill a hole in the exact centre of the cue in the joint section. This is being followed by a thread on the second drill. Glue is put in before joint parts are twisted in tightly for a permanent fit. At the end it runs through the cutting machine for the diameter of the cue needs to fit perfectly the diameter of the joint.

FERRULE (large brass copper ring at the front of the cue)
What are ferrules needed for? Their task is to prevent the front part of the cue from splicing through the impact of hitting a ball. Also bear in mind that ferrules come with different inner thicknesses of material; all with different reactions while cueing.
Most of the ferrules used do not contain a thread. But ferrules with inner thread still do exist. They are turned on the front of the cue to fit perfectly. This method needs accuracy and takes a bit more time. And there is a chance of the front part of the cue to break off during the process.

Using the ferrule without thread is a bit easier. The front part of the cue is being shaped for the ferrule to fit perfectly. This slightly thinner part at the head of the cue (where to put the ferrule on) is called a ‘tennon’. When glue is put on the tennon, you need to slide the ferrule over the tennon.
Now this may all sound like an easy job, but it isn’t. The diameter
of the front of the cue needs to run equally with the diameter of the ferrule. So believe us when we say this is a precise job.

